another brooch

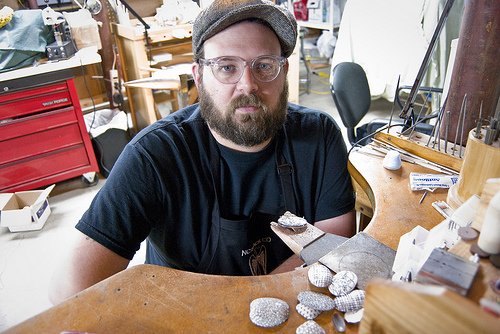
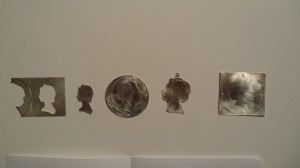
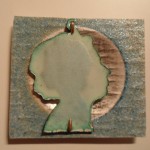
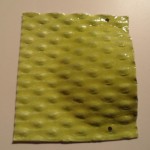
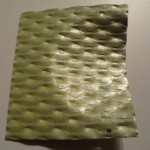
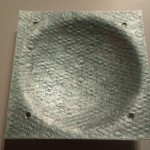
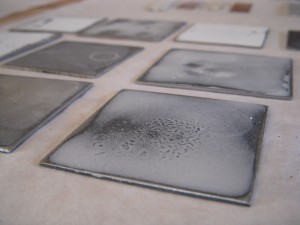
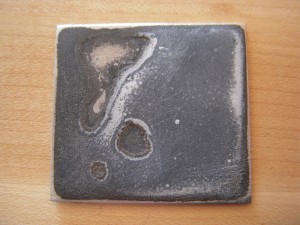
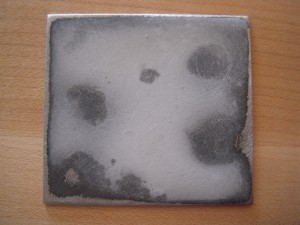
So back here I was waxing lyrical about the parts I was enamelling to put together a bunch of brooches. The image below was taken shortly after the image in that post, and shows the three inserts that I didn’t show before, mid way through enamelling. On the left-hand-side it also shows the centre piece of the work Blue Radical Axis, with the shot taken after applying a clear coat over the graphite, and before adding colour.

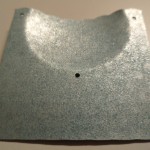
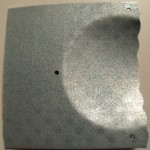
The three pieces on the right have each had a clear coat of liquid enamel, and then two layers of linework applied, layer by layer. The lines, first drawn in pen, have been covered in sandblasting grit with the remainder of the grit shaken off, so that just the slim slivers remain, which are then fired on (a technique borrowed from Elizabeth). Now, I say grit, but these are actually Ballotini glass spheres, of a very tiny size, that I would normally use to get a bright (almost polished looking) surface on metal in my sandblaster. They impart more of a texture than a colour, as they fire pretty clear.

Inserts for two brooches. Stainless steel, enamel, graphite, Ballotini spheres

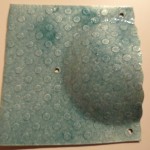
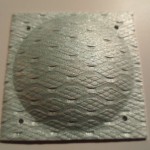
The final layers of enamel on this piece, which happened after this photo, were lines again drawn (3 lines in different directions, to represent x, y and z axes) but this time covered in regular white enamel, so that the topmost layer would have the most effect. Finally, the one representing ‘z’ received a thin coat of red.

xyz brooch. Melissa Cameron, 2012.


New Ideas

I am so excited too! I am nearly ready to start sampling, which I absolutely love as well. I work in so many ‘layers’ though that it takes a while to get to the kiln. However, I also do enjoy the process of laser and water jet cutting; the experimentation with the medium, embracing the serendipity of the unexpected between technology and the material. All the small multiples are cut and yesterday we finished the silver parts of my ‘companion’ series. The ‘companions’ will have a silver section with small areas of enamel and a white enamel piece with intricate laser engraving. The series of works will be called ‘Streets that run through Houses’ and still revolves around my research into Walter Benjamin’s Arcades Project.


Working on one of the lasers in the faculty.

The paper ‘companion’ tests.


I love laser engraving the enamel and find the so very fine line very beautiful. For me the laser is another medium for drawing, another layer of meaning I can add with the finest detail.


The water jet cutting the multiples


Another exciting event was a short trip to Barcelona last week and I saw some wonderful work. Just walking through the city is inspirational and I wish I had had these images before designing the ‘companions’.


And finally here are a couple of images for Amy: beautiful natural lines in front of a great building.

Arthur Hash


My name is Arthur Hash. I work as professional faculty in the Metal program here at the State University of New York at New Paltz. For the last ten years I have been incorporating digital processes (laser engraving, water-jet cutting, 3D printing and CNC milling) into my studio practice.  At an early age I was exposed to computers, mostly video games.  In high school, as part of a technology and design class, I was encouraged to experiment with AutoCAD (a 3D digital drafting program). Years later, I find myself using  CAD software as a sketching tool. I use it everyday, sketching out objects in virtual space.

In the world of 3D digital modeling, surfaces are comprised of small polygons or facets. I view these facets as almost a resolution for 3D objects.  It is very similar to digital images. A high resolution digital photo may have 600 ppi or pixel per inch where as a low resolution images might have a lower count. Maybe around 72 ppi. In 3D digital modeling, a HIGH resolution 3D digital surface may have up to 300,000 polygons or more. By increasing the number of polygons the surface becomes smoother and smoother. A lower polygon count produces a faceted object. For example, picture the facets on the surface of a soccer ball. If we double the polygon count then it is more like the divots in a golf ball. Double it again. Now the surface is more like texture of an orange. Once doubled again the surface might be completely smooth not noticeable by the human eye.

Using a laser engraver I have started a new body of work. I consider these pieces miniature, wearable “drawings”. They are flat projections of 3D digital surfaces. The polygon count has been reduced and the result is an etching that creates a jewel-like faceted surface on the enamel.

The heat of the laser, which burns the enamel at around 2500 degrees Fahrenheit actually “selectively over-fires” the enamel, vaporizing the silica. The result is a black line that is recessed into the enamel leaving a texture. The part of the enamel that is left retains its shine from the original firing.

I have made this short video to show you how the laser works when etching enamel on copper.

For more information please visit my website and blog. I look forward to posting more images and videos.

Sampling

I started the New Year with a number of projects on. Like Jessica and Elizabeth Turrell I am making work for an international show in Munich at Gallery Handswerk, ‘Enamel -a Renaissance’. I planned to build on the range of new brooches I made for the ‘Surface and Substance’ exhibition that Jessica curated so beautifully and which closed this January at the Ruthin Gallery in Wales. The new pieces I made for this show were brooches in silver and enamel that apply textile surfaces to the shell metal and augment them with pattern, movement and ultimately colour.

One other project has been making a piece for a jewellery show organised by the Association for Contemporary Jewellery to celebrate the Queens Royal Jubilee. An idea I had for this was to work with some diamond dust. Inspired by Elizabeth’s work fusing grit into her enamel surfaces I ordered industrial diamond dust and have been experimenting on how this material behaves with enamel. It has been wrought with issues of pinging off and shedding.

I now have several samples (the good, bad and the ugly, as I call them). It has been great to have these projects on and Heat Exchange turning up the heat too.  I hope to have some exciting new material to introduce into the mix here too. I can’t say too much more at the moment as it isn’t quite there yet…..(sorry to be a bit mysterious here)

Here are images of all of the above that are in this mix:

A series of Queens heads cut out for the Jubilee project to test. (the queen's head is one of the most popular names for a British pub, for those of you from outside the UK)

First Samples

I love making samples. Love. This is something I have discovered since becoming a resident artist at Penland. I have spent a lot of my time over the past three years exploring process, technique, and materials and made many, many samples. I realized the other day as I worked on my enameling what a luxury it is to be able to have the time to make samples. It really is. There are so many things we artists have to do in a day that it is challenging to carve out the time to explore. I am enjoying learning a new material and process and like making sample after sample just to see what happens if…I layer, over-fire, sand blast, stone, scratch, draw, drizzle water on a dried enamel surface, fire before the surface is completely dry. The aim is to learn and get comfortable through exploration and, ultimately, to find that distressed, messed-up, aged-looking, imperfect surface that mimics that kinds of things I am inspired by.

My favorite discoveries so far include incising lines on the surface of the metal as well as on the surface of the fired enamel using my flex shaft and a cutting or separating disc, over-firing, and dripped water on the surface of dried enamel. I have posted images of these findings here. The are tons more on Flickr.

incised lines, layered liquid enamel

over-firing, layered liquid enamels


dripped water, layered liquid enamels

I am really enjoying this time. Really and truly. Now I am beginning to consider the sample as more than a sample as many of them are turning out rather nicely. I hate to discard them for more “serious” pieces and so I’m thinking these samples might turn into the finished pieces. More on that later…

Thanks so much for reading.


new shoots…

This is the new kiln a got last year from Germany. It is wonderful to work with. fast to heat up and very steady at holding its temperature.
Pride and joy. This is the new kiln I brought last year from the Nabatherm company in Germany. Bliss to use. Quick to heat up and very steady reliable heat control.We have a jewellery bench adjacent the enamelling area. In a small area we have a lot of equipment that can be brought out and set up

brooches realised

I’ve finally got those images that I promised in my last post.

This is those same pieces of metal from the last photo, but enamelled! (Well, most of them, the insets of the big brooch at the top are m.i.a. since they weren’t enamelled yet.) This being a progress shot, none of the pieces are finished, as the white ones were all primed with a mix of clear + porcelain slip for some drawing action.

If you look close (or click on the image for the bigger version), you’ll also notice that the red piece is pinging at the holes. To remedy this I had to water everything down, doing a much thinner layer of clear, and two very thin coats of red. This time it’s totally stable, but beautifully shiny too!

To clarify, these pieces are all definitely stainless steel (excuse my mixup in the comments of the last post), with 925 silver fixings soldered with IT solder onto the backs, so are enamelled on one side only.

I’ve finished two of these pieces, while the third was a bit more tricky, but is now enamelled and awaiting assembly. That was the one that pinged the red layers. The centrepiece of that brooch (top left) didn’t appreciate the level of layering around those eight little holes, so rather than drawing in graphite, which involved two layers of enamel below and above it, I used a scraffito technique through an unfired layer of white as it required fewer. If I was a better enamellist I’m sure the graphite would have worked fine…

I have also finished a neckpiece that has an enamelled centrepiece, but more on that later. Here’s what the bottom right pieces look like assembled.

Melissa Cameron, Blue Radical Axis 2012. 65mm x 33mm x 10mm

artists exchanging energy